
Consider the lighting lecture online, the lighting class and the exercise you shot. This prompt is for you to review all that you’ve learnt about lighting and apply that knowledge to a reflection of the exercise you lit and shot – you don’t have to limit yourself to your own work, you can look at the other group or tute’s work. Feel free to embed screen grabs, diagrams or other material and similarly you could bring in other research. You could talk about: the kinds of light, the kinds of lights that you’ve used, the motivation of the light, how light affects the shot, how lighting affects the shooting procedure, how would you go about figuring out the lighting for your next shoot etc. This does not have to be an academic piece of writing – it’s more to get you to think and reflect upon lighting. We understand you’ve only started on the lighting journey.
_______________________________________________________
Lighting is one of the most important aspects of making a video. Lighting can creates a mood, a look and feel for the video. But it’s not just about pointing the light anywhere to ‘brighten up’ the scene, there is an actual technique to do it. In week 9, we learned about lighting technique called the 3 Point Lighting. This technique works with a fill light, key-light and back-light.
- Key light: Prime source of light on a scene.
- Fill light: Reduce the contrast of a scene (fill in shadows caused by other lights, mainly a key light).
- Back light (Rim or Hair light): helps to separate the subject from the background, add some dynamic and creates mores depth. Basically it gives the 3d dimensional look.
In this exercise, we did some experiments with light. We tried to experiment just by replacing the 3 lights with with different sources. First, we prepared all the lighting equipments. Then, we turned off all the lights and start with a clean slate. Once we have turned off the lights, we started to set up the key light, fill light, and back light. Below are the two examples of results:
Example 1
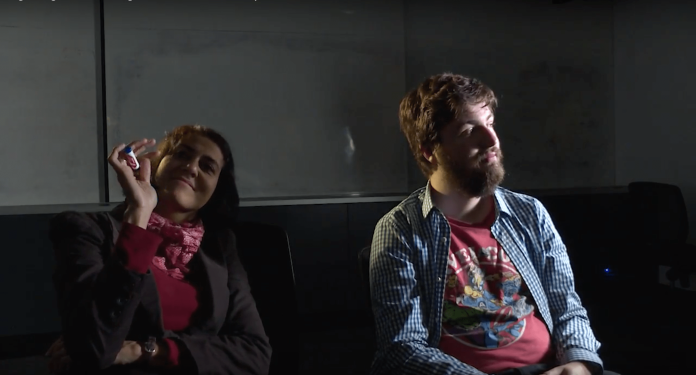
In the first example, the key light is positioned on the side of the subject (Josh), back light is positioned behind Janine. As the main light comes from Josh’s left side, it caused harsh shadows and bright highlights on left side of Josh’s face. There is also not much lights on Janine’s face. I can barely see Janine’s eyes. According to Lightscameraaction (2018), “a good way to really bring some life into the subject is to make sure they have some eye light.” I also noticed the darkly shadowed left side of Josh’s face and bright highlight on right. In my opinion, it may need to be repositioned to achieve the better results. But actually it depends on the story, the look, or desired result that we are trying to achieve.
Example 2
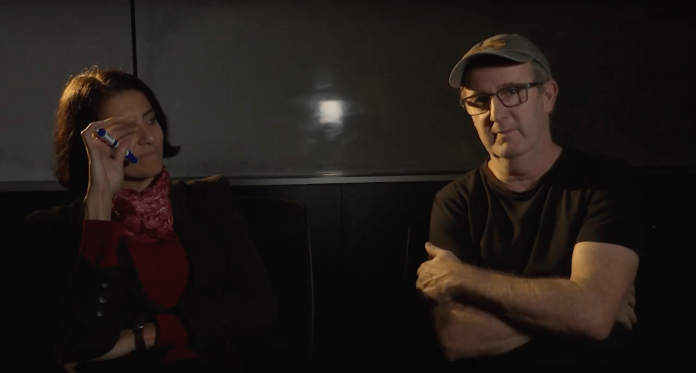
In the second example, we tried different way to set up the light in order to make the shots visually more interesting. Not only the lights set up that matters but also the camera set up. Because lighting is all relative to which way camera is facing and where the subjects facing. So, what we did is we first moved the camera to the front of the subjects and we’ve got the camera facing down a little lower than it was so that we can have a nice head space. Then, we tried to dim the key and fill light down, brighten the back light up a little bit more and set up the white balance. As we can see in the picture above, the temperature is more warm and the transition between the light and dark is more gentle compared to previous set up. It gives some nice variation in Paul’s skin tones because it is kind of accenting the dark side of his face.
The use of back light defines an outline that helps separate the subjects from the background. It creates a nice highlight on the Janine’s hair and Paul’s shoulders as the back light is positioned behind her. Although, it is still a bit underexposed on parts of Paul’s face, it still gives a very dramatic look and looks particularly moody.
It was a very interesting experience as I get to learn a different approach to set up the lights and change the mood and tone of a scenepick the right look for the story. For instance, a hard side lighting creates lots of drama, while a soft front light creates a softer mood. So, I believe by experimenting in lighting direction and the softness of the light, it can creates different effects and moods in a photograph.
References:
Lightscameraaction 2018. 5 quick tips to light your interviews better. Available from: http://lightscameraaction.info/5-quick-tips-light-interviews-better/. [ 1 June 2018]
